Floating
Floating is an important self-rescue technique for water survival to keep you afloat. It can be used while waiting for help to arrive and as resting position when swimming to safety.
In this session we practice floating skills in deep water and learn how to make a float with a buoyant aid or with our clothes, swim with that float, deflate and inflate the float again.
Wearing full gear, step into shallow water and walk into shoulder deep water.
Then lift your legs up and start floating.
Skill Training - Sculling
Both the drownproofing sequence and treading water use sculling. This is a rhythmically controlled motion of the arms and hands to manipulate the water for upward lift and keep the body vertically afloat.
A common sculling action is the figure eight. With the fingers together and palms facing downward, draw a figure eight with each hand, pushing the water downward and outward during the motion. Keep the arms slightly bent in front of the chest. Use a minimum of effort to avoid excessive fatigue.
This means simply lying flat on your back with your feet relaxed and slightly apart. Your arms are at your sides moving slowly side-to-side. If you feel yourself sinking, raise your chin putting your head further back in the water. The key to effective back floating is to relax your body. Very little motion should be required to remain afloat.
Get into a sitting position in the water.
Rhythmically move your arms back and forth at the same time you move your legs like on a bicycle.
Care should be taken to keep the head above water as much as possible.
Float with a Buoyant Aid
Use anything that floats and is big enough to support your weight. A buoyant aid like a bucket or bag or a canister is a good start.
Trap as much air as possible in the buoyant aid and hold it to your chest so you can remain afloat. The skill is in holding your float so the air doesn't escape.
Another method is to use larger floats, like rescue rings, foam mattresses, and the like. See if you can get on top of them. Keep your balance and relax on top of the float.
Floating with a Waterproof Rucksack
A waterproof rucksack makes a great float. You can use it it to swim across to an island, change into dry clothes, have a meal and spend the night in a dry sleeping bag. Comes the morning your wet clothes have dried so you can pack up and swim back or onwards to another island.
The water survival training emphasized three key concepts: waterproofing, survival swimming, and confidence-building in a water environment.
Waterproofing Your Rucksack
If properly waterproofed, all rucksacks have enough flotation potential to keep even the largest camping equipped survival swimmer afloat. Therefore, a rucksack becomes an asset during water survival training. You can waterproof your rucksack with plastic bags, or the more robust canoeing bags. To waterproof and secure the rucksack, use the following procedures:
Arrange all gear neatly inside a plastic bag with the most commonly used items on top. Fold or roll clothing. Press the bag tightly to squeeze out excess air. Use a series of folds to form a watertight seal of the bag, and keep the folds in place with a rubber band. Place the bag inside the rucksack. Close the drawstrings of the rucksack as tightly as possible.
Place the sleeping bag inside a plastic bag, and press out excess air. Place this inside a waterproof bag. Tie the waterproof bag closed as tightly as possible, ensuring that the plastic bag is entirely inside. Securely attach the waterproof bag to the back of the rucksack under the closing adjustment straps.
Securely attach the sleeping mat to the top of the rucksack under the closing adjustment straps. You should now have a waterproof bag that will float. You can either wear it on your back or tow it behind you.
Single Rucksack Exercise
Attach a canoeing helmet to the rucksack. Wearing full set of clothes, enter the pool at the deep end using the stride entry. Remove the waterproofed rucksack, put on the helmet, and push the rucksack the length of the pool to the shallow end using the frog or scissor kick.
Two Rucksack Exercise
Fully clothed, enter the pool at the deep end using the stride entry. Remove the waterproofed rucksack from your back. Grab your partner's rucksack. Swim the length of the pool to the shallow end pushing one rucksack while towing the other.
Inflate Your Clothes to Float
This exercise involves inflating clothing with air to stay afloat. If you do not have a life jacket when in the water in an emergency situation you can make your own emergency water flotation device using your clothing. Lifeguards and Boy Scouts practice this technique by removing clothing such as pants or shirts while underwater. This is a useful skill to learn and great fun to practice.
This may not work with all clothes.
You may have to experiment a bit with different outfits.
Waterproof or cotton clothing will work well for this purpose.
Rainwear or canoeing cags are probably best.
Other clothing might work, but air may leak faster.
It must be free of holes.
To retain air, cotton material that is above water must be kept wet or it lets air through.
Inflate Your Top
Make a close seal with the collar around your head. The nose stays out above the collar, the mouth is just inside.
Now breathe in with the nose and exhale with the mouth into your anorak or T-shirt. Exhale below the collar.
Notice how the air volume builds up over time. If you keep a good collar seal the air with stay in for a good while.
A tight collar is an advantage.
Long sleeves hold more air.
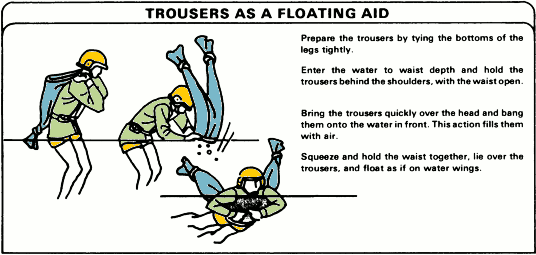
Trap Air in Your Trousers
The amount of air that cotton trousers will retain in water is enough to keep you afloat if you remain calm. When the ends of the legs or drawstrings are tightly tied, each leg will hold a pocket of air.
Remove your trousers while swimming in deep water. Tie knots into the lower legs or tie the trouser legs together, and button or zip up the fly. By tying a knot in the legs of your trousers you can raise them above the water to fill them with air which enables them to float.
Inflate your trousers with one of the methods below. Float with this buoyancy aid for 1 minute. Re-inflate as required. Swim 15 meters using the inflated trousers for support, then show how to re-inflate them while using them for support.
Blow air into your trousers
Put your mouth inside the collar but keep your nose out.
Now inhale with the nose, then exhale through the mouth into your trousers.
Soon they fill with enough air to keep you afloat.
Splash Method
Hold the waistband open underwater with one hand.
While using the scissor or frog kick to stay afloat,
splash water and air toward the waistband opening with a downward motion of the hand.
Stop the stroke at the opening.
Forcing a current of water and air bubbles into the trousers straightens the pant legs.
The water passes through leaving air trapped at the ends.
Gather and hold the waistband together.
Slip your head between the trouser legs, and place the knot behind your neck.
Lie back and float.
Sling Method
Hold the waistband open with both hands behind your head.
Then sling the trousers over your head,
scooping in the air that is trapped when the open end of the trousers (the waistband) hits the water.
Now position yourself between the legs and stay afloat.